Tender, juicy, flavorful–not always words used to describe pork chops. These lean medallions have long been on the receiving end of overzealous searing, roasting, and baking rendering them tough, bland, and dried out. No more. The secret to pork chop perfection takes a little extra time, but it’s well worth it in the end, and most of the prep work is hands-off and stress-free giving you time to prep the rest of your meal.
The Chop
When it comes to choosing your pork chops, bigger is better. Thin cut pork chops can dry out quickly and become tough and hard to chew. These thin cut chops are best suited to breading and frying. For a juicy and moist be sure to choose a chop that’s at least 1-inch thick, has good marbling in the interior of the meat, and some fat remaining on the outer edge of the chop. Pay close attention to color as well. Look for richly colored dark pink chops since they generally have more flavor than pale cuts.
Boneless pork chops are more readily available, but you can also use a bone-in chop. These chops are generally larger and have more fat and dark meat attached to them. However, there is the extra hassle of cutting around the bone when it’s time to eat. Fortunately, the cooking method we use to get the perfect pork chop will have the same result whether you’re using a boneless chop, or one with the bone still attached.
Pro Tip: If you do opt for bone-in pork chops don’t throw them away! Even after cooking the bones have plenty of flavor left to give. You can add them to a pot of beans for extra pork flavor, or make a simple broth for soup or rice
Salt

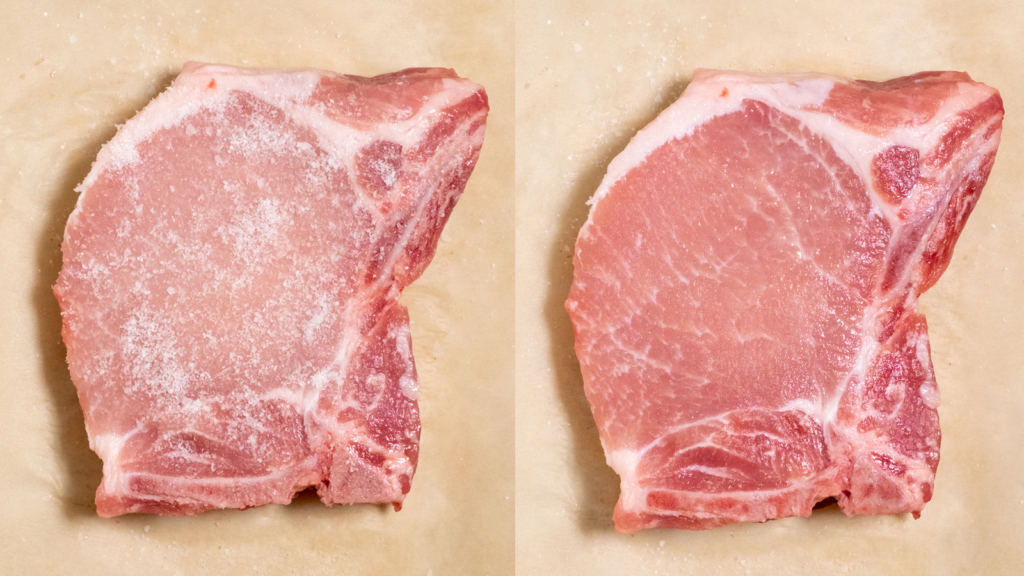
Seasoning your pork chops generously–at least ½ tsp per side, yes you read that right, at least–is paramount to a great tasting, juicy pork chop. If you have a kitchen scale a good rule of thumb is to use between 0.5-2% salt by weight. This seems like a lot of salt, but keep in mind that meat is about 75% water so it takes a good amount to have any noticeable effect. The salt has two effects on the pork chop. The first is a dry-brine. Brining is traditionally thought of as a salt, sugar, and water mixture that meats are submerged in, however, a dry-brine is a simple coating of salt that initially draws moisture to the surface, but then the salt is slowly absorbed by the meat and pulls the moisture down into the meat. In order to give your chops enough time for this absorption, it is important to season 1 hour prior to cooking. Secondly, salt also tenderizes the meat by altering the protein structure to retain moisture. Similar to its wet-brining counterpart, the dry-brine helps to retain moisture while cooking. Meat proteins begin to seize up around 140˚F and release their moisture. By denaturing the proteins with salt they release less of their moisture and stay juicy.
Sous Vide
Sous vide is an excellent cooking technique for lean meat that can easily dry out when seared or roasted for too long in a pan or oven. Vacuum sealing the meat reduces the moisture loss when cooking and prevents the exterior from overcooking before the interior has reached a safe temperature. The temperature equilibrium that the entire piece of meat you are cooking will reach is essential to ensuring a juicy pork chop. On top of the precise cooking another perk of the sous vide technique is it requires very little attention. There is no need to stress about whether or not to leave the pork chop in the pan for another minute or endlessly poke it with meat thermometers to check the internal temperature. Sous vide is almost completely hands-off so you can attend to other tasks. The only decisions you have to make are the time and temperature. Time is fairly simple. Make sure your chops are fully submerged in the water bath for 1 to 4 hours. If you have a thicker chop err on the longer side.
Searing
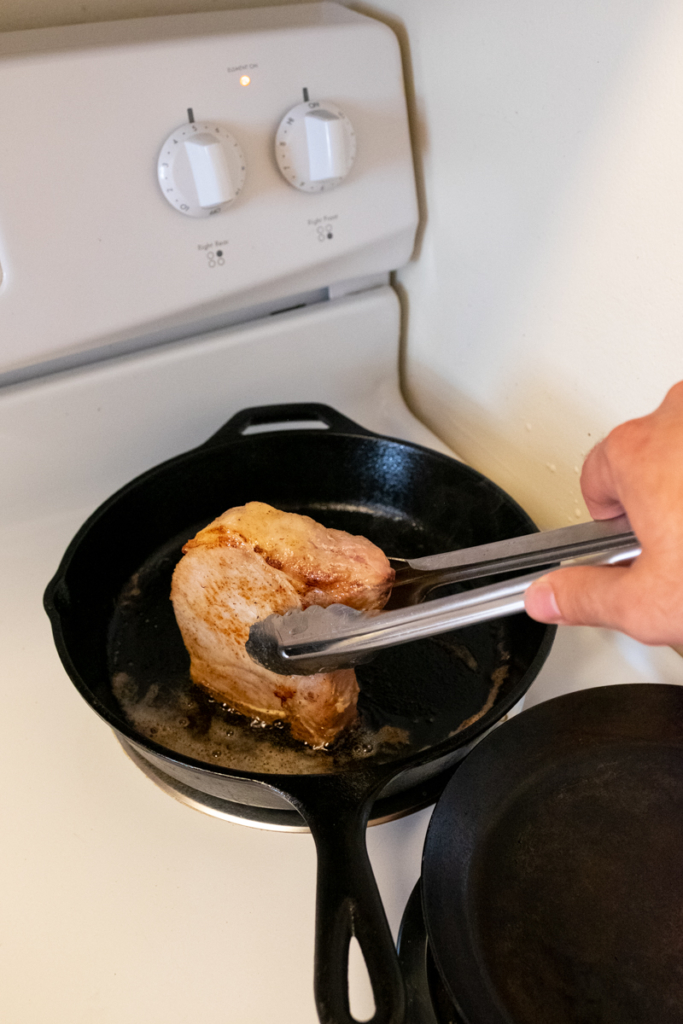
One drawback from the sous vide technique is the closed environment that helps keep the chops moist while they cook and reduces moisture loss also prevents any browning or Maillard reactions (which require air) to take place. A quick searing in a hot skillet takes care of this problem without adding too much stress or mess. There are three elements to achieving a good sear: the pan, the fat, and surface moisture. Heavy-bottomed, cast iron, or carbon steel skillets will maintain high heat and cool down much less when the pork chops are added. Skillets that lose too much heat will end up steaming the meat instead of searing it. Usually when searing steaks or chops you want a neutral oil with a high smoking temperature–canola, vegetable, or grapeseed oils are all commonly used for searing. Butter is not generally recommended for searing because the milk solids can scorch and burn if they cook for too long at a high temperature (cook them low and slow and you’ve got browned butter). Usually, butter is added at the end of the searing process and is used to baste the meat while the interior is coming up to temperature. The beauty of preparing the pork chops with the sous vide method is they are already cooked, we’re not waiting on the internal temperature, we’re simply adding color and flavor to the exterior in as short a period of time–so as to prevent any overcooking–as possible. The enemy of a good sear is surface moisture. When this moisture is exposed to the heat it steams the meat and instead of a deep, golden-brown crust, you end up with a pale grey exterior. Be sure to pat your pork chops as dry as you can with paper towels right before searing in the hot skillet.

Choosing your Temperature
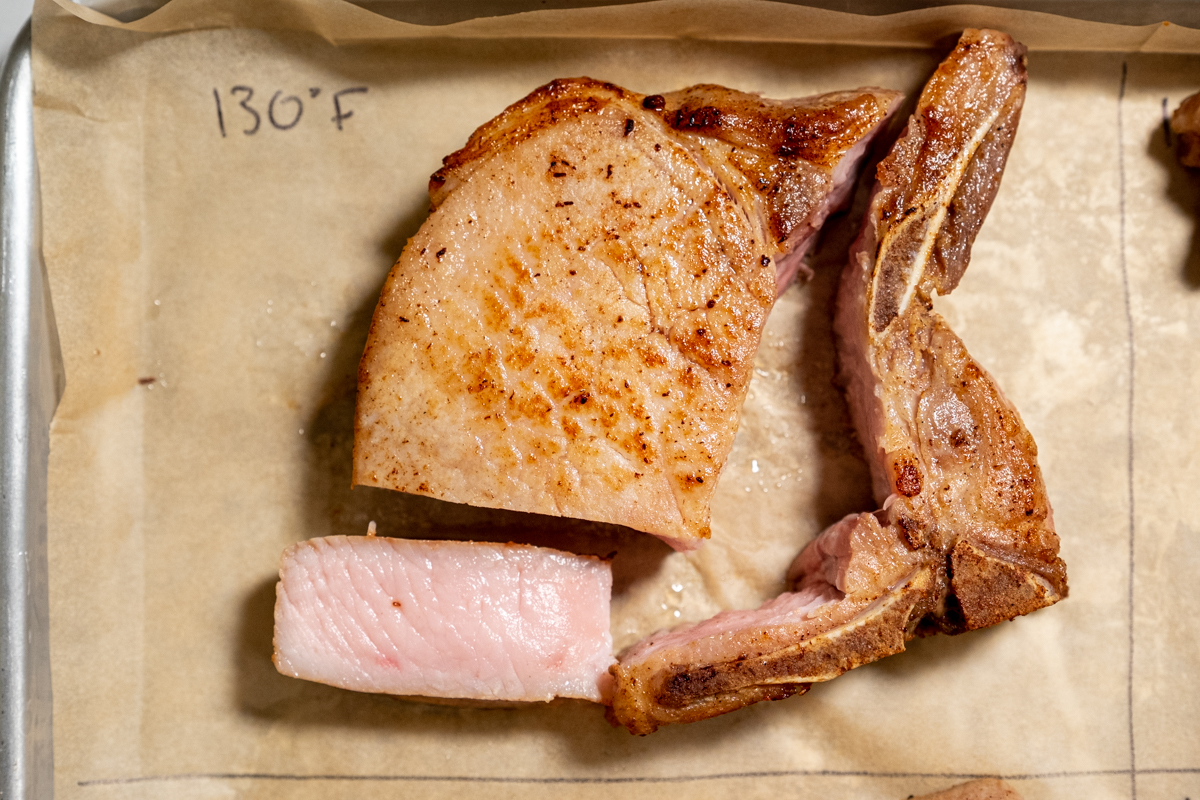
The biggest decision to make when cooking your pork chops is what temperature should you use to get your desired texture. I tested 4 different sous vide temperatures, all using the same style 1-inch thick, bone-in pork chops. All 4 chops were seasoned with the same amount of salt and rested for 1 hour before going into the various temperature sous vide water baths. After the sous vide bath all of the pork chops were patted dry with paper towels and seared with butter for 1 minute on each side, flipping every 30 seconds.
130˚F – Very pink. Juicy and fairly chewy. This texture takes a little getting used to. If you like the texture of rare steaks this may be what you’re looking for.
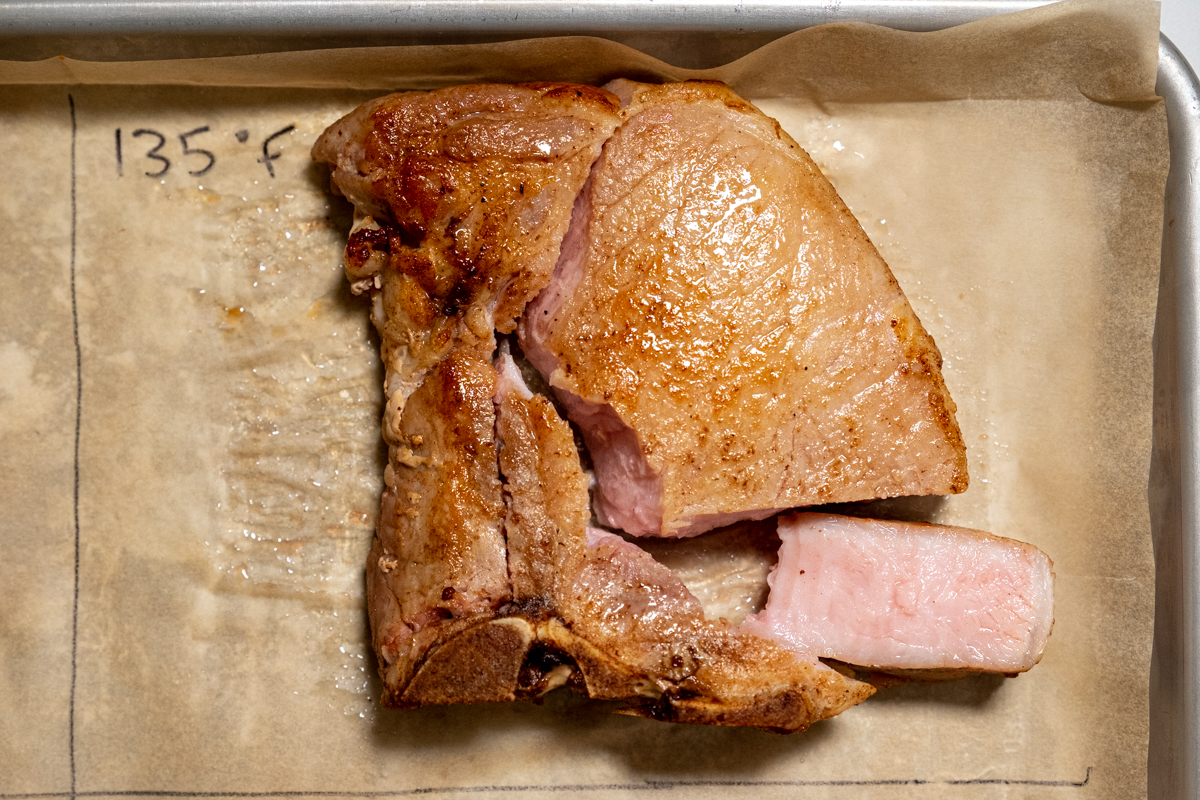
135˚F – Pink. Slightly firmer texture than the 130˚F, but still a fairly meaty chew. Really juicy and flavorful, feels much richer than how lean pork chops usually are.
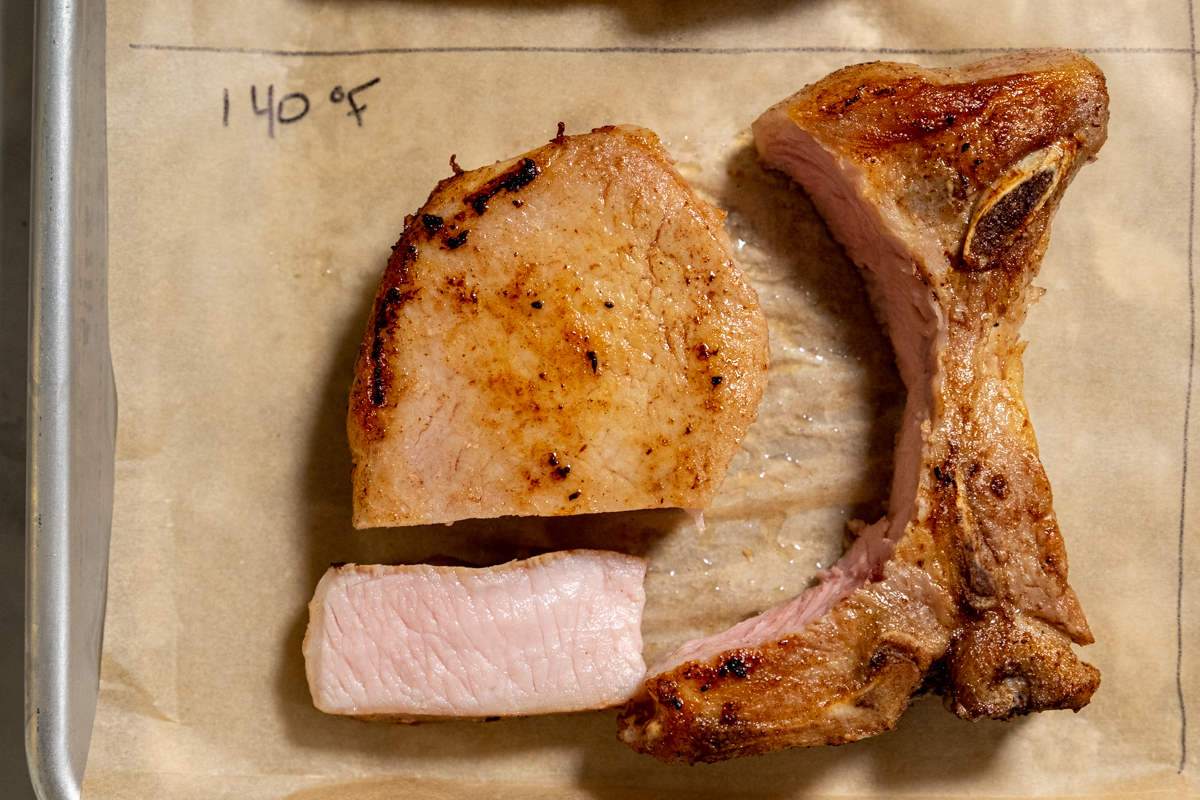
140˚F – Slightly pink. My personal favorite. I thought I would like the 135˚F chop more, but I found this temperature had the best of both worlds. It’s still juicy and tender but doesn’t have the chewiness of the lower temperatures. It’s not overcooked, the texture is firm but not stiff and is very easy to chew.
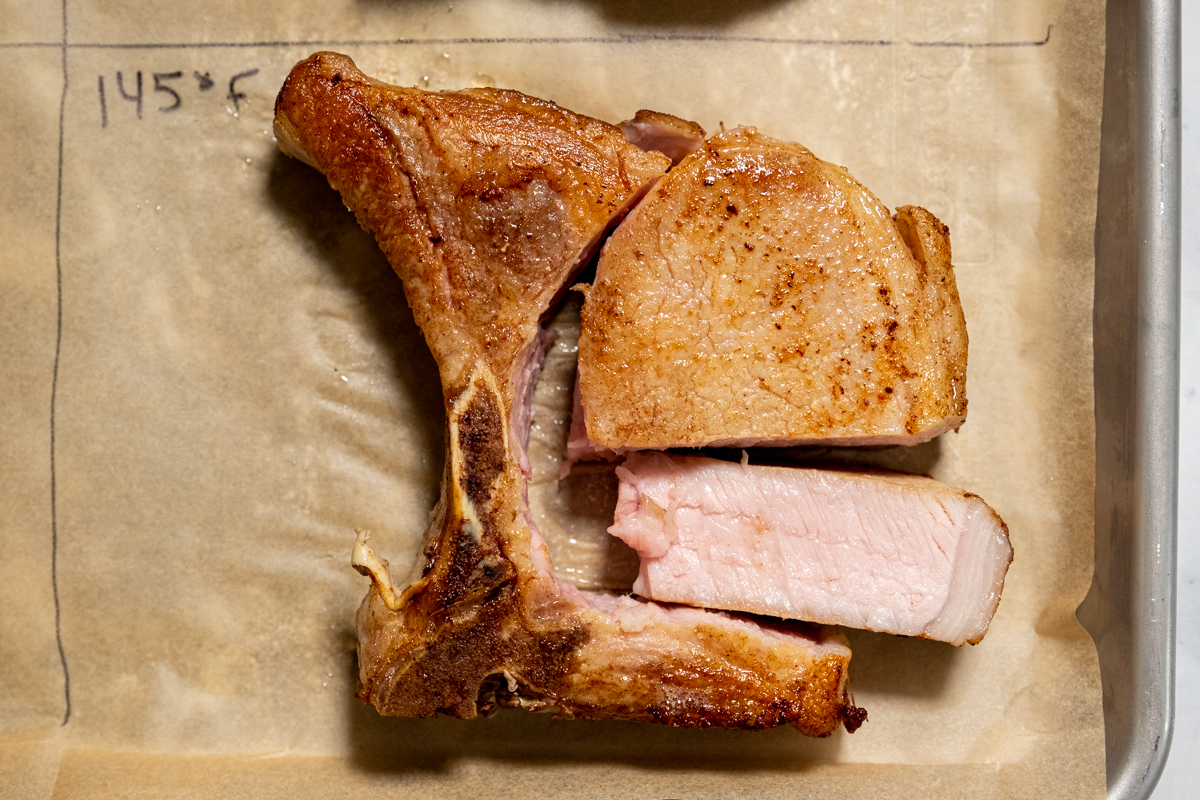
145˚F – No pink. Not quite dry, but definitely not as juicy as the lower temperatures. This is the closest to a traditional center cut pork chop texture. The muscle fibers are noticeably tighter and the meat is clearly white throughout, no traces of lingering pinkness. It was still pretty tender, but starting to flirt with dryness and a slight tackiness between your teeth.
Recipe
- Season the 1-inch thick pork chops with ½ tsp salt per side. Let rest for at least at room temperature 1 hour to absorb the seasoning, or up to overnight in the fridge. Vacuum seal in an appropriate bag or use the water displacement method with a zip-close bag to remove any air.
- Sous vide for 1 to 4 hours at your chosen temperature (between 130˚F and 145˚F). Remove from the water bath, cut open the bags and place on paper towels to dry.
- Heat a cast iron skillet over medium-high heat for 5-7 minutes. It should be hot enough that if you flick small droplets of water on the pan they audibly sizzle and evaporate immediately. Add 2 tbsp butter and swirl to coat, cook for 15-20 seconds until the foaming subsides.
- Pat the pork chops dry again with a paper towel and add to the pan. Sear for 1 minute per side, flipping every 30 seconds so the chops are seared for a total of 2 minutes.
- Move to a cutting board to rest, wipe out the skillet and repeat with any remaining chops. You should only cook 2 at a time to prevent crowding in the pan.